
Transpose Any Audio Easily in Logic Pro X 10.3.2

Logic Pro X: Track or Region Based Automation?
Logic Pro X 10.1 has a new button for selecting track-based or region-based automation. But which one should you be using and why? Darren Burgos tells you the way it is and shares tips along the way.
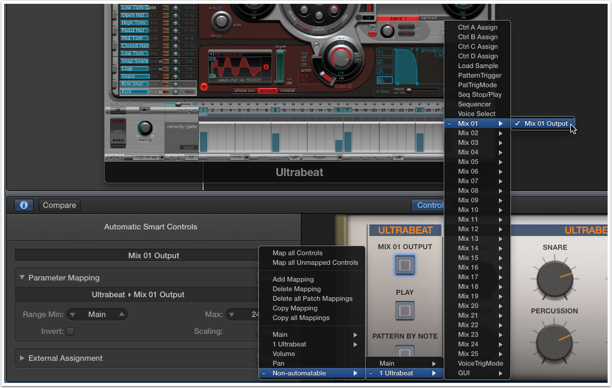
Making Multi-Out Setup Easy in Logic Pro's Ultrabeat
Even if you know how to create a multi-output setup for Logic Pro X's Ultrabeat, you should read this excellent tutorial by Darren Burgos with some advanced tips on how to make multi-output easy!
blog comments powered by Disqus
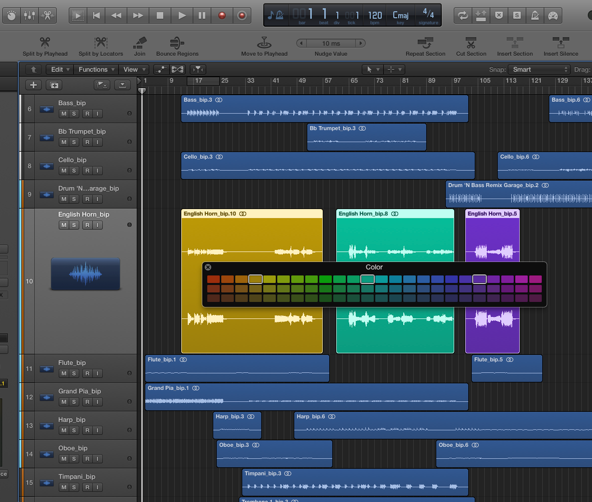
Logic Pro X: A Smarter Color Palette
Who'd have thought there was room to improve the Color Palette!? Even though you can no longer choose custom colors, Apple has made it considerably smarter. Very often you'll have different colored regions on a track after picking various shades from Logic's Color Palette. In Logic 9 if you wanted to select the same shade, it was either a test of your ability to distinguish subtle color variances, or you simply remembered where the color was on the palette! In Logic Pro X, when you click a track with various colored regions (with the the Color Palette open) it shows you all the region colors used on the specific track with a white highlight. You can also click any region, or shift click regions on other tracks to display the colors. No more guess work!
blog comments powered by Disqus
Logic Pro X: Snapping in an Audio Take Folder
For nearly 4 years I've been waiting for this feature! Audio Take folders in Logic Pro X can finally snap to the beat. In Logic 9, lot's of dance artists pack take folders full of audio loops, then Quick-Swipe across them to grab element chucks from the different loops for a stop-chopped electro house technique. I have an article I wrote for macProVideo on doing this very thing. The only problem with this technique up until now, was that when you went to swipe across the various takes, your swipes were not quantized/snapped to a beat. You had to watch the time bar ruler at the top of the arrange window to make sure your swipes were at least close to snapped position. Now in Logic Pro X you can enable "Snap Quick Swipe Comping to Absolute Values" from the Snap menu. This literally snaps your swipes to beat!
Thanks for reading …keep an eye out for more Logic Pro X tips.
blog comments powered by Disqus
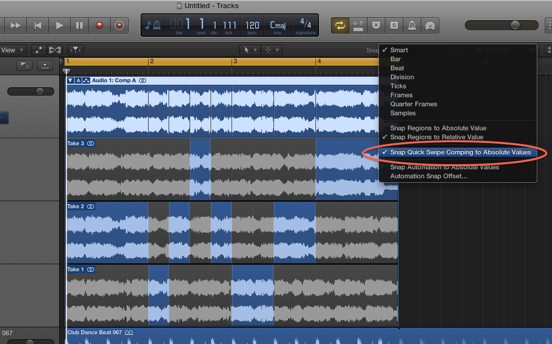
Looping Cut Up Regions in the Arrange Window
When you edit your drums in the Arrange window as audio, it’s common to have individual drum sounds like isolated kicks, snares, hats and more. This is a great way to edit your drum parts, but what happens when you’d like to loop the section you built? First you have to select the regions you want, and copy them, but pasting is not always easy because the snare for example is normally not on the start of a bar. You have to zoom in far enough so you know the copied snares you're about to paste are in the right position.
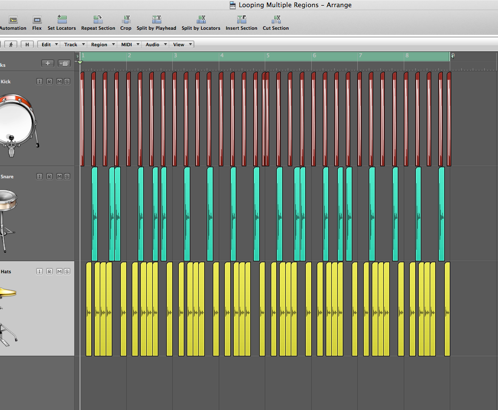
Let’s make looping cut up audio drums a bit easier by converting them to perfect neat 8 bar (or however long your part is) regions. First let’s do the kicks. These are easy for me, because they start at the beginning of a bar, and end perfectly on one too.

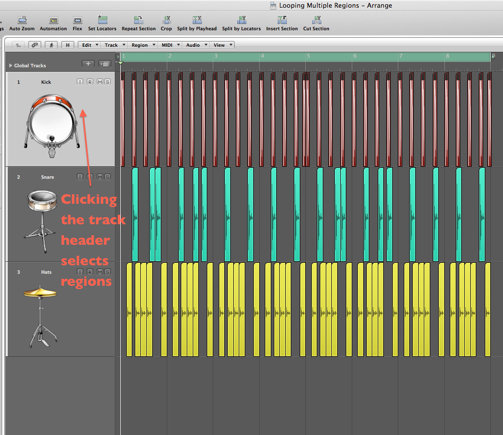
I’ll first click the track header for the kick. When I do this, all the regions on that specific track get’s selected, or if there’s a cycle enabled (as there is in the example image below), it will select only the regions inside the cycle area.
Once they’re selected, use key command ( Control • = ) to merge all the selected regions into one new region. A window will appear reminding you that if the regions you’d like to merge were not originally contiguous, a new region will be created. You want this, so select “Create.” The way I remember this one is I think; multiple regions added together equals one new region.

Now the snare and hats are a bit trickier. The snare for example doesn’t start or end at the beginning/end of a bar. If we simply used our ( Control • = ) command to merge all the snares, the resulting loop will be off, since it won’t be a perfect 8 bar block. Let’s fix this problem.
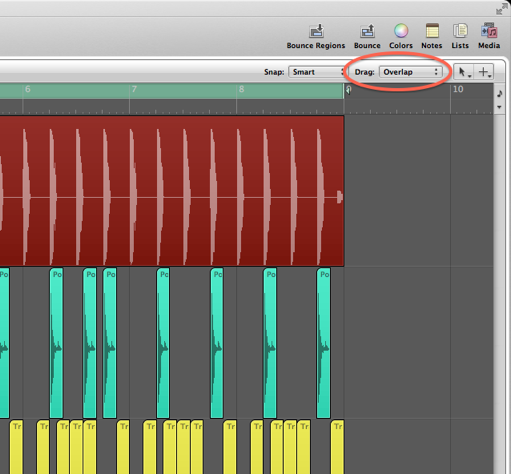
First, make sure “Drag” is set to “Overlap.”
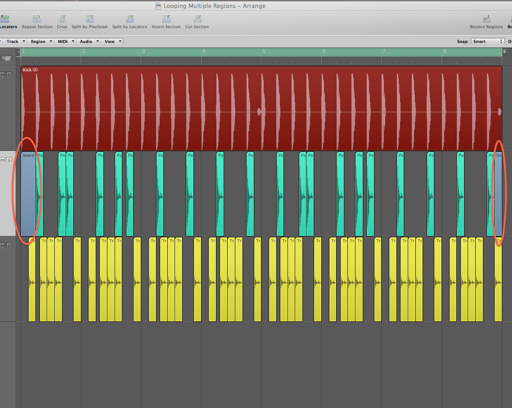
I’ll point to the beginning bar on the snare track and right/(control) click, then I’ll select “Create Empty MIDI Region.” Now I’ll move the timeline to the second beat of the bar, and use key command ( Command • ] ). This is a great command that adjusts the end of a region to the timeline position. You may have guessed that the ( [ ) adjusts the start of the region. Now I’ll do the end. I’ll just option click and drag the region I just made to then end, and adjust it’s end so it’s just a small sliver that stops exactly at the end of bar 8. Here’s how it should look...
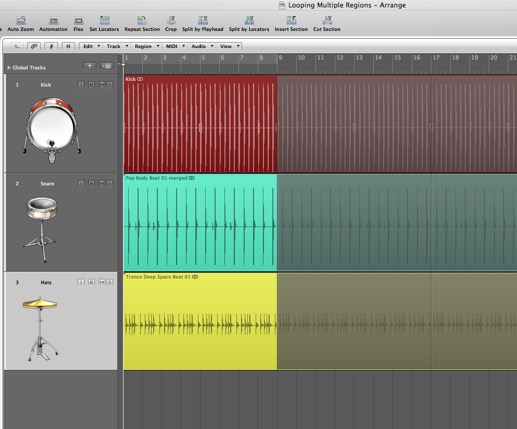
Now I’ll select all the regions and merge them with the same technique I used on the kick above. I’ll do the hat in the same way I did the snare. Now I simply press “L” on all three regions to keep the beat looping!
Hope you enjoyed the tip!
blog comments powered by Disqus
Logic Pro Beat Production Tips 1
blog comments powered by Disqus
Step Enter Notes Using Your MIDI Controller
In this tip, I'll show you how to enter notes directly into the Piano Roll window with your MIDI keyboard controller. We'll also set up some great unassigned key commands that will help you along the way.
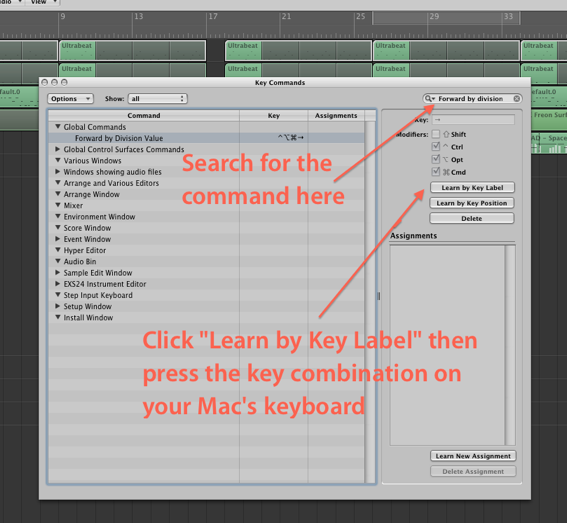
First, open the Key Commands Window (Option • K) and set up these specific key combinations to the following commands. These are all unassigned commands, and the key combinations I chose should all be unused also (If you're using Logic's default commands):
Search for: "Forward by Division"
Click the Learn by Key Label button
Then press (Control • Option • Command • Right Arrow)
Now search for and set these three additional key commands:
Seach for: "Rewind by Division"
Click the Learn by Key Label button
Then press (Control • Option • Command • Left Arrow)
Search for: "Set Next Higher Division"
Click the Learn by Key Label button
Then press (Shift • Option • =)
Think of this one as the + symbol since it shares the same key
Search for: "Set Next Lower Division"
Click the Learn by Key Label button
Then press (Shift • Option • -)
Create an empty region, then double click it to open the Piano Roll. Make sure the time line is at the start of the region (Use the < or > keys to move the timeline bar by bar). Click the IN button at the top of the region and play a chord on your MIDI keyboard. The notes are directly added to the region! 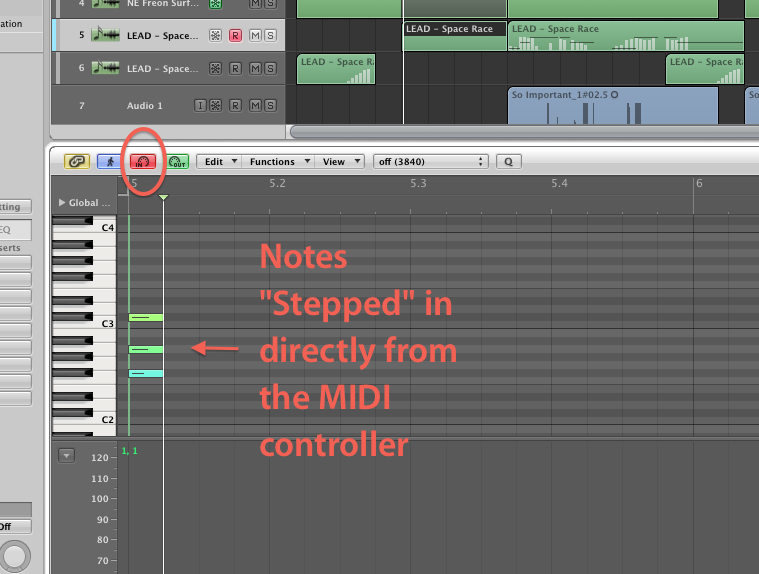
The length of the note is set by whatever division value you have set in the Transport (directly below the time signature), or you can pre-define the note value by opening the "Step Input Keyboard" from Logic's Options menu.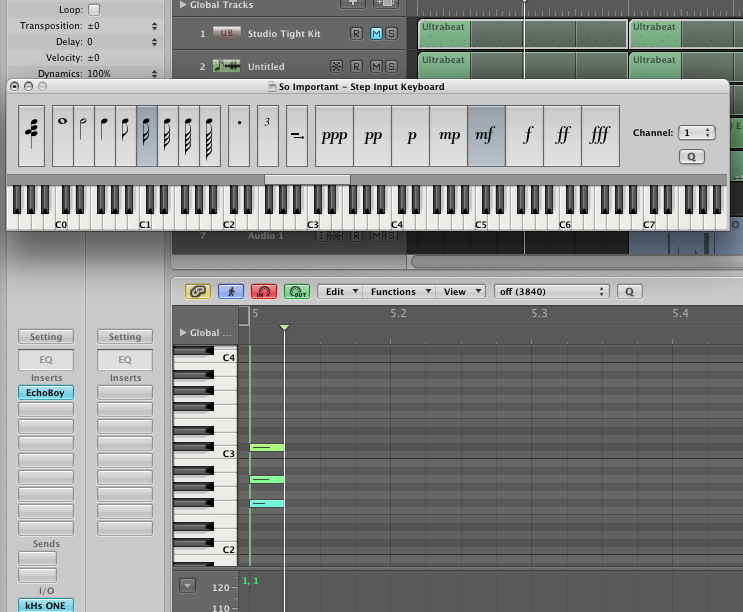
Now depending on the current division setting, the timeline moves to the next division value. This is not always where you want it to be, especially if you want gaps or rests between the notes. Try the Forward/Rewind by division commands you just set. It pushes the timeline forward/back by the set division so you can enter the next note(s) where you wish. If the division is not what you want, then use the other cool commands you just set "Set Next Higher/Lower Division."
If you select the notes you just entered, you can use Option • Left/Right Arrow to move them around by the Division value, and if you use Shift • Option • Left/Right Arrow while they're selected, you can lengthen them by the Division value!
Hope you find this valuable! Till next time.
blog comments powered by Disqus
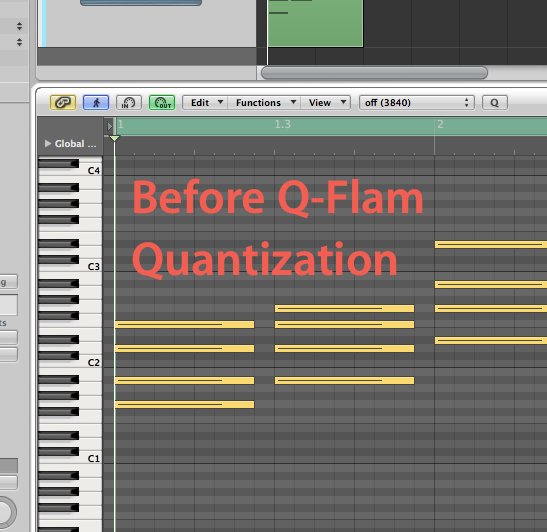
Creating MIDI Strums and Flam
Have you ever tried to make strums from chords in Logic? It’s a major pain! You have to click each individual note in the Piano Roll, and move it forward or back in time. In this tip, I’ll show you how to use the Region Parameters window to easily make MIDI Strums.
We’ll start by quantizing some chords. Select the region, then from the Region parameters window (at the top of Logic’s inspector) choose 16-Note as your quantization setting. For the strum to work, you must select a quantization value here…

If you’re one of those “I hate quantization” people, don’t worry, you can loosen the quantization up by clicking the Advanced Quantization triangle, and selecting a value below 100% under Q-Strength. (See image below)
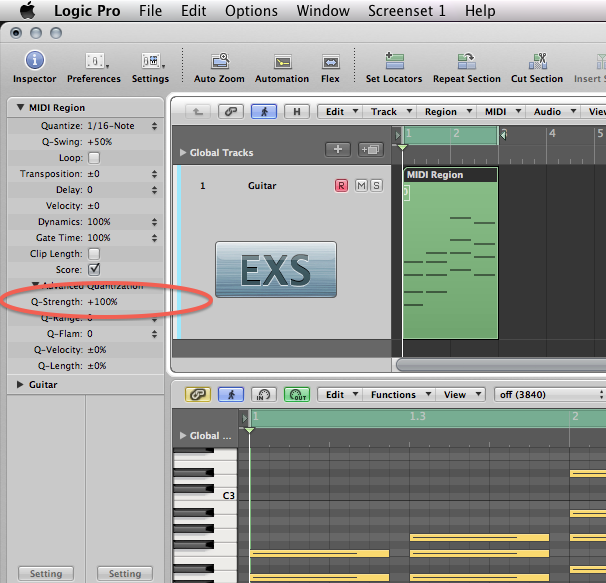
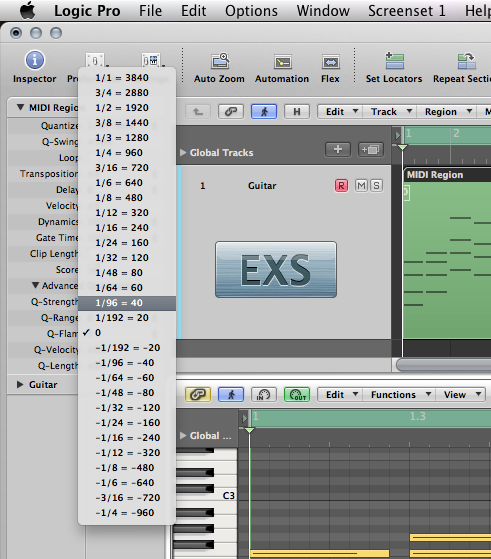
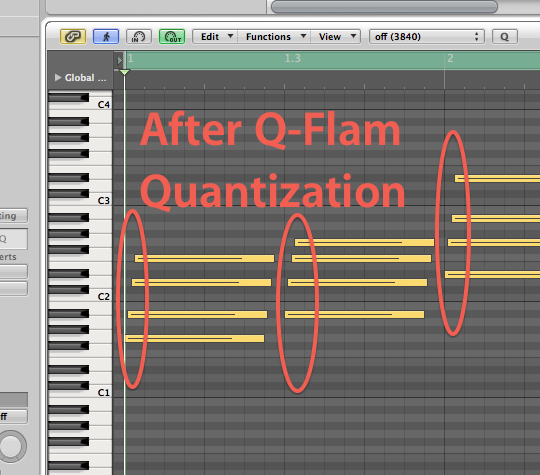
Now let’s make the strum/flam. From the Q-Flam menu, either click/hold and move up/down directly to the right of the word Q-Flam, or select a note length value from the menu with the up/down arrows farther to the right. I’m going to select 1/96 with a positive value (above the zero position). If I chose a negative value, the top note of the chord would have started first.
Hope this helps you out. Till next time!
blog comments powered by Disqus
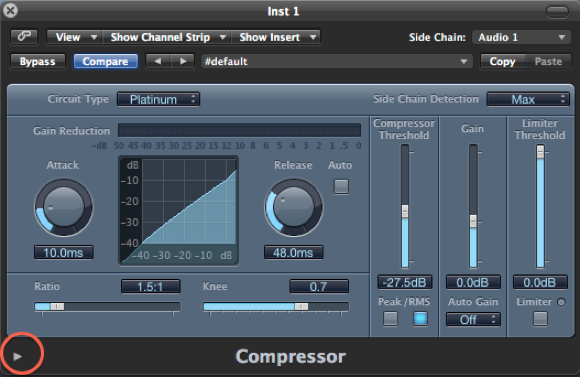
Compressor's Extended Parameters
Logic's built in compressor has some cool hidden features. When you click on the small arrow on the bottom, it opens to reveal Compressor's extended parameters...
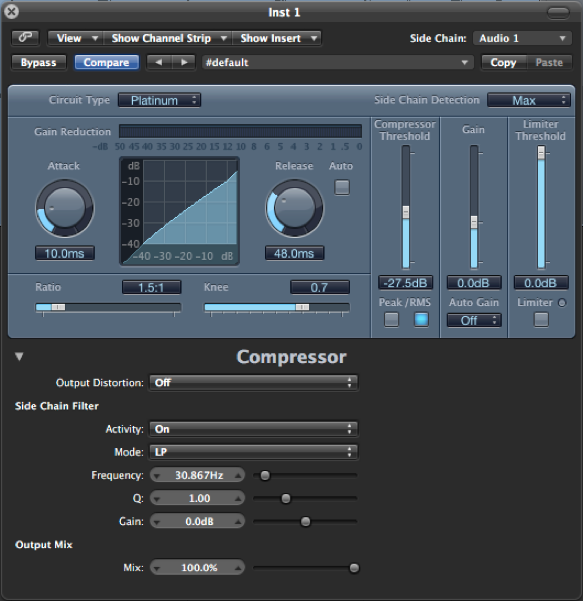
First in the list is "Output Distortion." Since Logic uses 32-bit floating point for audio, the volume ceiling is so high, that it's basically unreachable. Nothing can really distort until the signal reaches your main outputs. This parameter puts a "false ceiling" on the output, so Compressor acts more like a physical piece of gear being driven to capacity. Try experimenting with the various settings (soft, hard, and clip) …also make sure the compressor's gain is above 0 dB or no output distortion will be heard.
Next is the Side Chain Filter. Have you ever wanted to use a kick from an audio drum loop as a side chain source? Normally, if you choose an audio loop as the source, the entire loop (and all it's content) triggers the side chain compression (the kick, hats, snare, toms …everything). The 5 parameters in the Side Chain Filter area, literally let you "filter" out sounds you don't want triggering the compressor. For example, if you only want the kick to act as the side chain source, you can choose LP (Low Pass) from the Mode drop down menu. The different parameters are as follows...
Activity. This has three positions …OFF, Listen, and ON. When in the "Listen" position, you can solo the track and actually hear the side chain source feeding through for perfecting it (with the other four parameters below it). After you've perfected the source with the Listen option, you then change to ON so it can start effecting the sound.
Mode. There are five options in the menu. Low Pass, Band Pass, High Pass, Parametric, and High Shelving. These will let you filter out any of the frequencies you don't want triggering the compressor. If your side chain source is a drum loop, you can filter out all the highs with a Low Pass to focus on the kick, or a High Pass to filter out all the lows and use the hats or snare as the side chain source. There's even a Band Pass filter if your want to use mid toned material for your source like vocals.
Frequency, Q, and Gain. These three parameters allow you to fine-tune the side chain sound. After choosing the filter type from the Mode menu above, you can then adjust the frequency, the width of the frequency (Q), and the volume (Gain).
Last in the list is the Mix slider. This is actually very cool. There's a type of compression called "New York" compression. Basically, you mix the dry signal with a compressed version. The standard way to accomplish this, is by using a send. This slider does this for you by mixing in the dry signal (by a percentage).
blog comments powered by Disqus
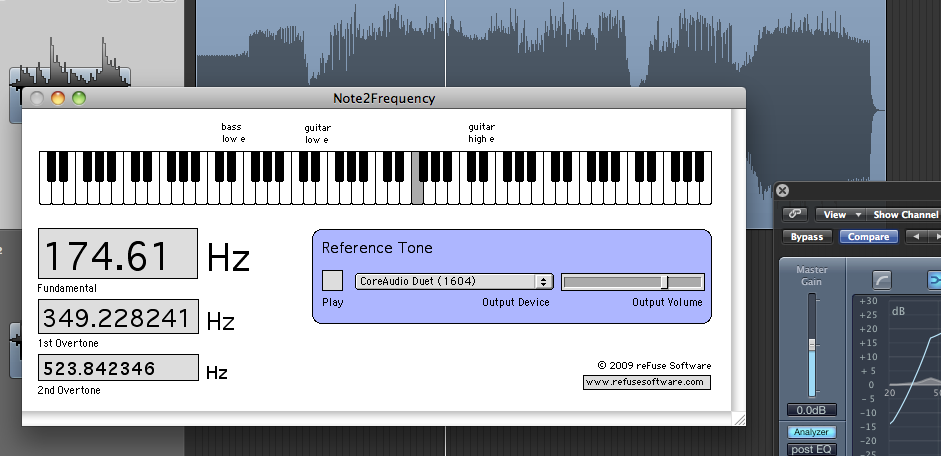
EQ in Key
When you're boosting frequencies in an EQ, sometime it helps to focus around the root key of the your track, or on notes that are in the same scale. This company Refuse Software makes a free utility called "Note2Frequncy." You can use it to easily see the frequency value of musical notes.
blog comments powered by Disqus
Extracting a Drum for Separate Processing
There are often times when you want to quickly process a drum sound with it’s own set of effects. When you’re on a creative roll though, the last thing on your mind is setting up Multiple outs! In many cases like green Apple Loops and some third party drum modules, Multi-outs isn’t even available. Extracting a single drum sound for separate processing can be a quick and easy task. This tip is probably the fastest way to accomplish this. Keep in mind that if you’re running Logic on a slower system, this method requires the duplication of the channel strip (the instrument and all the plug-ins on it).
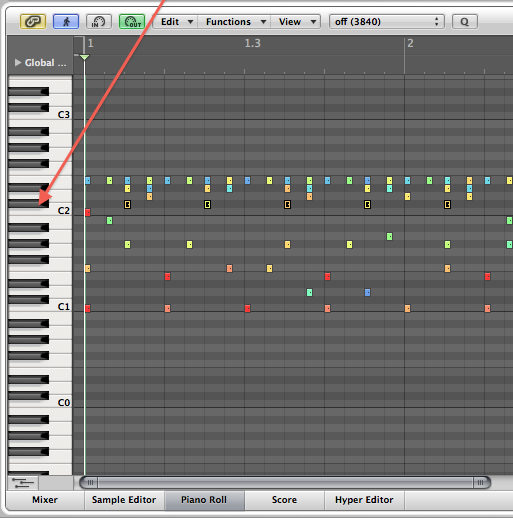
1. Open the region with the sound you’re extracting in the Piano Roll, and select the entire length of the sound by clicking it’s key on the vertical keyboard. (See Image Below).
2. Command - X to cut the sound from the region.
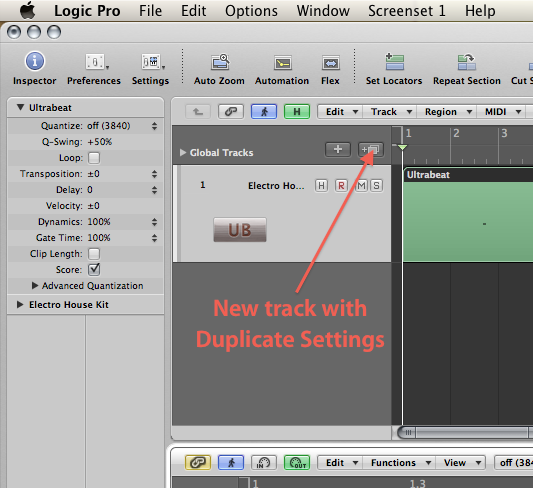
3. Next, duplicate the track/channel strip by clicking the “New Track With Duplicate Settings” button. (See Image Below).
4. Control - Click/Right Click and select “Create Empty MIDI Region.” Make sure it’s placed at the same starting position as the original region. (See Image Below).

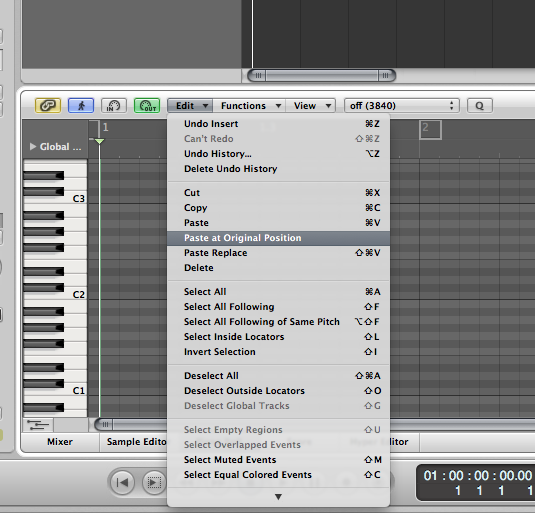
5. Double click to open the empty region in the Piano Roll, then select “Paste at Original Position” from the Edit menu. (See Image Below).
Done! The entire process takes about 10 seconds to complete. You don’t even have to resize the new MIDI region; when you paste, it automatically expands the region to fit the content.
Hope this helps, and thanks for reading.
blog comments powered by Disqus
Bass Sidechain EQ Tip
In Logic, try putting an EQ on a Send/Bus that is set to a High Shelf (that is floored), and a Low Shelf that is (to the ceiling). Push up the send about a quarter of the way. You can then play with the Low Shelf's Frequency parameter to nail the tonal feel and harmonics of a bass.
blog comments powered by Disqus
Capture MIDI...even when you're not recording
When playing along to a song in Logic on your MIDI keyboard, have you ever regretted not being in record mode? What if there was a magic button that could capture what you played, even when you weren’t recording? After enabling the “Capture Recording” button, you’ll be able to do this.
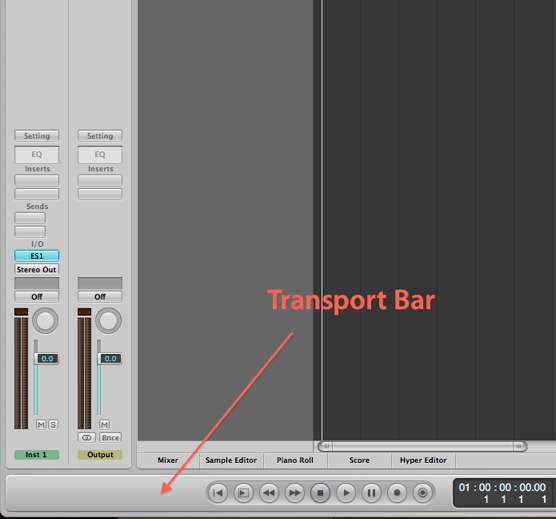
First, let’s enable the “Capture Recording” button by pointing to the Transport Bar at the bottom of the screen, then “Control + Click” (right click). (see image below). Click “Customize Transport Bar...” when a list of options appears.
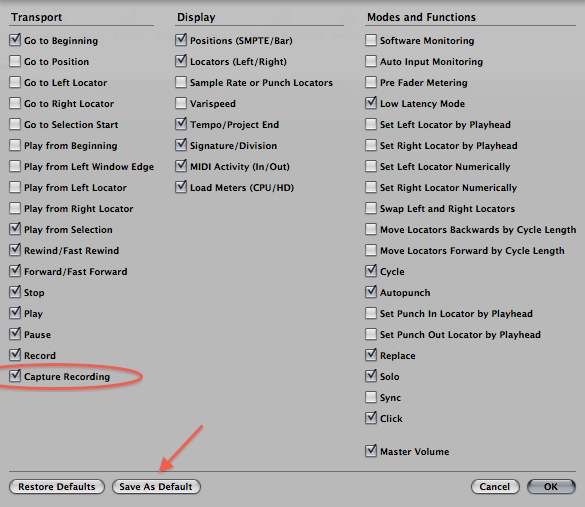
This will open a window with many buttons. (see image below). Click the checkbox for “Capture Recording.” You may want this button to be available in every future project, if so, click the “Save As Default” button before closing the window.
You’ll now have a new button to the right of Logic’s record button (a circle within a circle --- it can be seen in the first image above). Think of it as a regular record button, but this button is pressed AFTER you play.
There are a couple of things to keep in mind though...Logic must be playing. In other words, - you were “playing along” to the song/track. -- Nothing is recorded if Logic was not in playback (the timeline wasn’t moving) -- Even with the drawbacks, this feature is amazingly useful. In most cases I’m playing along with the track I’m making...I’m always confident that whatever I do, can be instantly captured. As soon as I’ve played something worthy of being captured, I stop Logic from playing back with the spacebar, then I immediately click the “Capture Recording” button. Everything I played on the MIDI keyboard -- from the last point Logic with was put into playback -- is captured and placed into the Arrange window on the currently selected track.
Tip: If you press play again before capturing the recording...and then play even a single note, the buffer is reset and you’ll lose the MIDI you intended to capture.
You can also be in cycle mode and click the Capture Recording button! So imagine that you were looping a section of your song to practice with. Every return cycle is recorded, and Logic even pulls them into a “Take Folder” for you. Just like an audio based Take Folder, the region has a small triangle in the top left corner. You can click this to reveal the takes. You can’t however “quick-swipe” as you do on audio, but you can select which take plays back. You can even piece the entire MIDI performance back as if it were recorded linearly. To do this, click the arrow on the RIGHT side of the region, and select “Unpack Take Folder.” This will disperse the MIDI Takes onto tracks where they can now be placed one after the other.
Tip: If you want to put them back together in the exact order, keep in mind that the very bottom region is the first take.
Hope this tip helps!
blog comments powered by Disqus
Get Creative with Take Folders
Take folders are an invaluable addition to Logic Pro when you’re comping vocals, recording guitar, or any other live instrument. You can “quick swipe” sections from different recordings in a stack, to make a composite from the various parts. In this lesson, I’m going to show you a creative way to use Take Folders to make those “stop-chop” parts you hear often in Dubstep, and Electro/Progressive House.
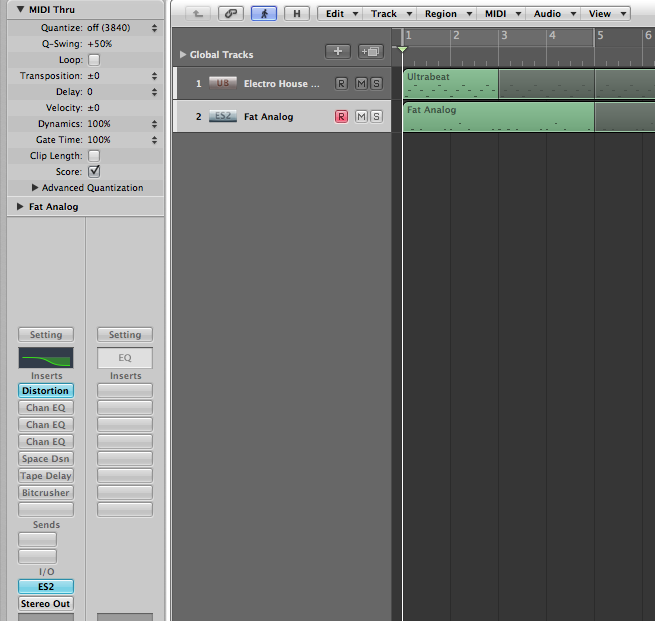
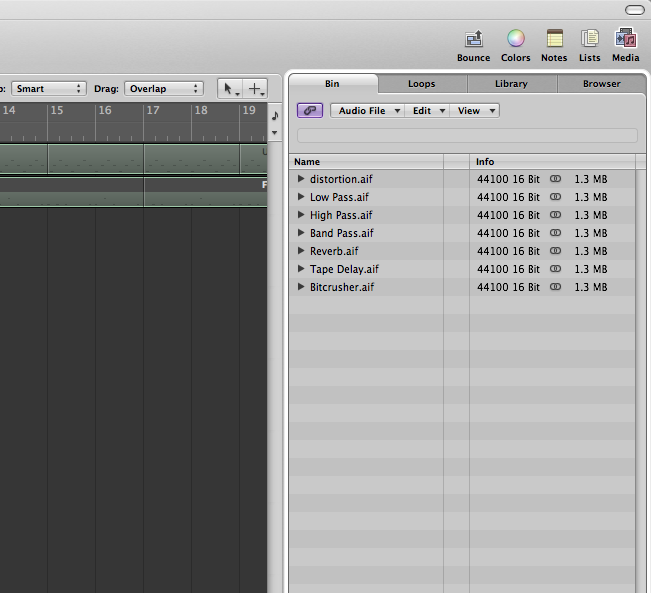
If you’ll be following along, open a Logic Project you’re already working on, or create a new one. I’ll be using an ES2 bass line that I recorded, and an Ultrabeat playing back a simple pattern. I’ve added various effects to this bass line like distortion, different EQ’s (high pass, low pass, and band pass), Reverb, Delays, and a Bit Crusher. I’ll only be using one effect at a time, so I’ve bypassed (option click) each of the different effects below the topmost effect (see image below).
Make sure the region is selected, then go to Logic’s File menu, and choose “Export Region As Audio File” from the Export menu. (If you don’t have a key command set for this, try setting it to: Command - Option - R in the Key Command window.) You’ll want to navigate to the project’s Audio Files folder since Logic doesn’t seem to default to this location when using this command...even when your project is saved. Name the region your about to save so you’ll know which one has the specific effect on it. In my case, I’ll name this first one “distortion.” Make sure you check off “Add Resulting Files to Audio Bin” and un-check “Bypass Effect Plug-ins” before saving. Also, consider using “Overload Protection Only” from the Normalize drop down menu (this will actually LOWER the volume of the region below zero decibel if it was clipping). After you’ve saved the first region, option click to bypass the top effect you just used, then option click the one below it to enable it. Repeat the steps above to save the region with each of the effects you chose. You should end up with a collection of saved regions in your bin (see image below).
Display the Bin by hitting “B” on your keyboard if you haven’t done so already. Select all the files you just saved, and drag them all to the Arrange window at the same time. A window will appear with three options...choose “Create New Tracks.” This will place each region on a new track below one another. Make sure all the regions are selected (by default, all the tracks are selected after you’ve dragged them to the arrange window), and select “Pack Take Folder” from the Region Menu’s Folder Menu (see image below).
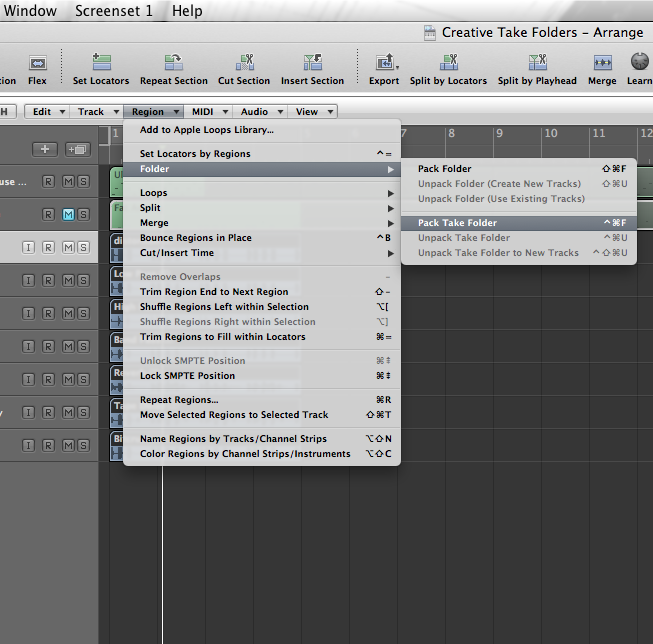
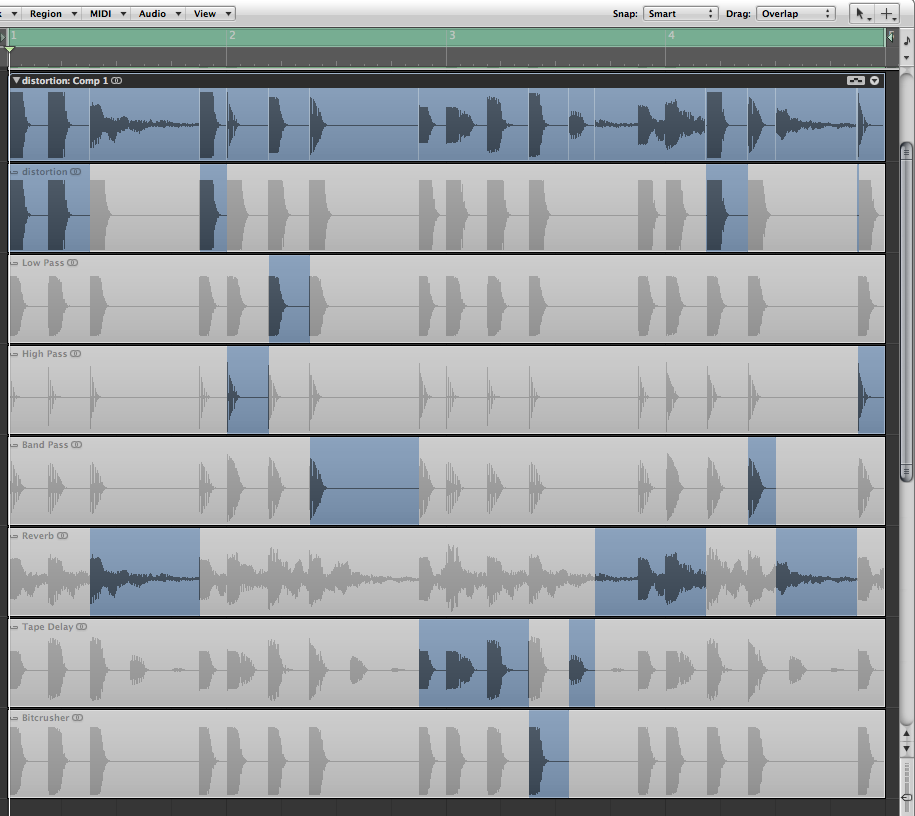
All the regions are now packed nicely into a Take Folder! Delete all the unused tracks below the take folder, then click the disclosure triangle to reveal the stack of takes within it. Here you’ll find all your saved regions named perfectly so it’s easy to see what take has what effect on it. Zoom the Take Folder by hitting “Z” on your keyboard, and start Quick Swiping! You’ll get blasts of different effects that stop where you’ve swiped to select the next segment. (see image below)
TIP: Currently, Quick Swipe Comping does not “snap to grid,” so be carful where you place your “swipes”...you should try to get them as close to a grid value as possible. You can change your grid value in the Transport window directly below the project’s time signature if you need a smaller or larger value. Hopefully in the next version of Logic this will be fixed/added!
Thanks for reading!
blog comments powered by Disqus
Merging Tracks from Different Logic Projects
Have you ever wanted to grab an element from a different song and use it in the one you’re currently working on? How about reverting a single track to its original state from a previously saved version? Before Logic 9, merging elements from different Logic Projects was a pain. In this tip, I’ll show you how easy it is.
First of all, open a Logic Project (any will do). You’ll be extracting a complete individual track from another song --with everything that makes it play back--, including the Channel Strip, the Audio/MiDI region(s), and even any busses you were using!
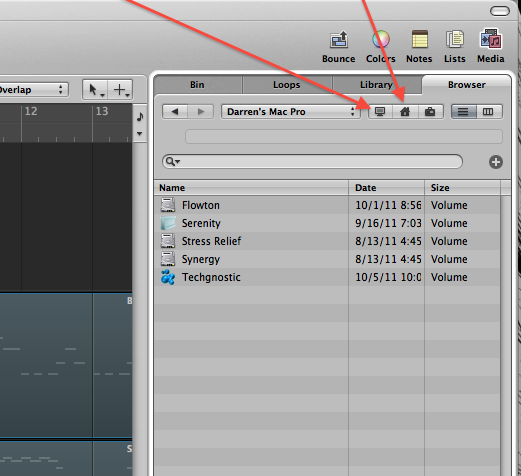
Next, press the “F” ket to bring up Logic’s built in File Browser, and navigate to the location of the source Logic Project. (If the project is on an external drive, click the icon that looks like a screen, if it’s in your Home Folder, then click the house icon.) See Image below.
When you find the song, open the Project Folder by double-clicking on it. Select the actual Logic Project itself by clicking on it once. See image below.
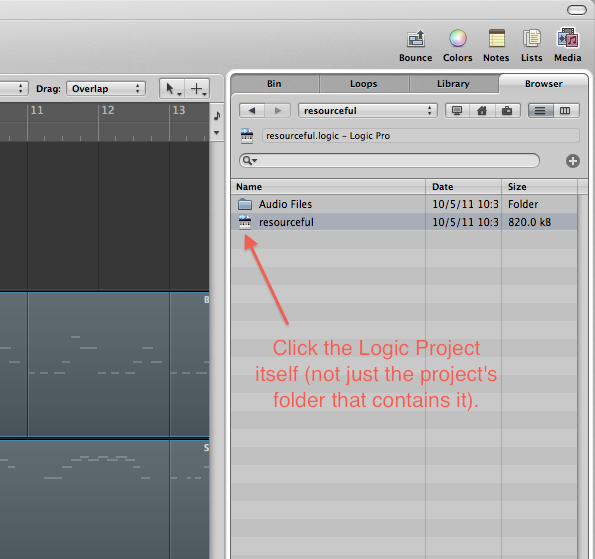
Click the “Import...” button at the bottom of the File Browser Window.
You’ll now see a list of all the tracks in the source Logic Project/Song. Simply look for the track (this is where naming each of your tracks properly comes in handy!), and select everything across the row, that you can put a check-box on See Image Below.
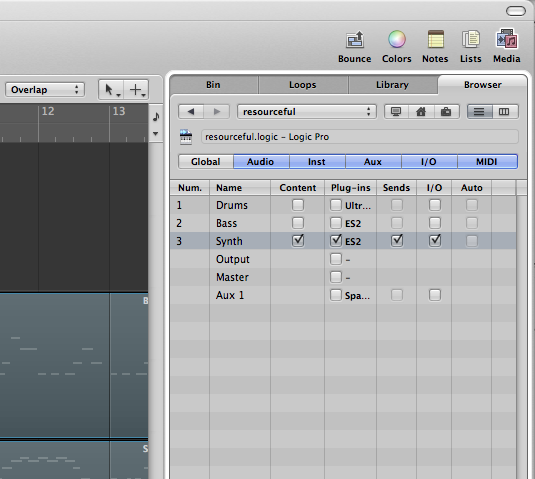
Now, at the bottom of the File Browser Window select either “Replace” or “Add.” This will either replace the currently selected track in the Arrange Window, or create a new one with your chosen track.
In the image above, take a look at some of the other things you can import like Automation and even the Global Tracks!
Hope this helps, and thanks for reading!
blog comments powered by Disqus
Control and record tempo changes on the fly
Speeding up and slowing down the BPM of Logic on the fly can be very useful during a live performance, or while working with other artists in your studio. Today I’m going to show you how to control Logic’s tempo with a MIDI controller, and even record the changes you’ve made.
- First, go to the File Menu and select “Project Settings”, then “Recording.”
- From this window, enable the “Allow Tempo Change Recording” check-box. Because this check-box is located in the Project Settings, you’ll have to enable this for every Logic Project you intend to use this on.
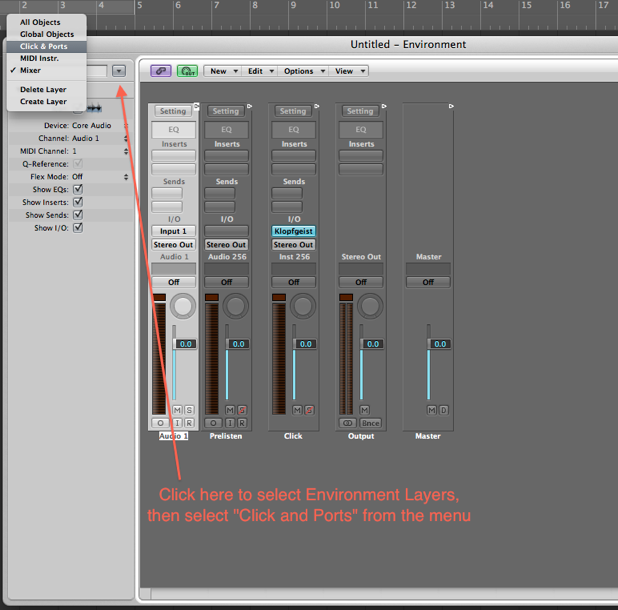
- Next, go to the Environment window (Command-8), and select the “Click & Ports” environment layer (see image below).
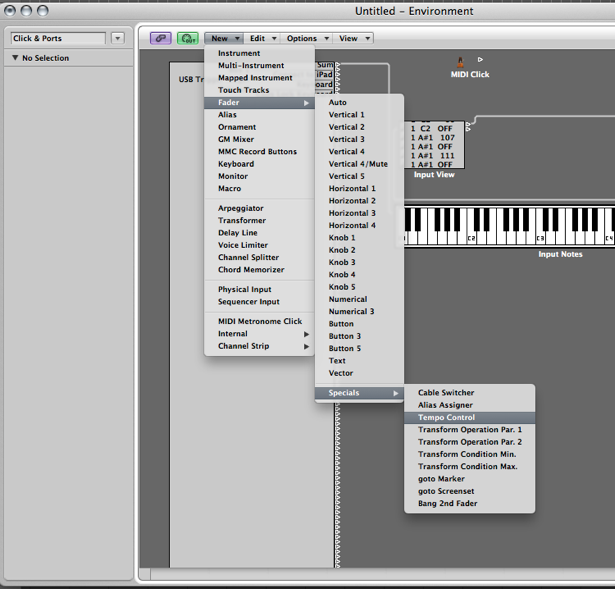
We now need to add the “Tempo Control” environment object. From the Environment’s local menu bar, you can add the object by selecting it here: New: Fader: Specials: Tempo Control (see image below).
A dialog box will appear saying “To record directly into the sync reference please cable the Tempo fader between Physical Input and Sequencer.” To do this, break the cable from the Input View currently going to the Sequencer Input, and place it into the left side of the Tempo Control...then take the output cable from the Tempo Control and insert it into the Sequencer Input (see image below).
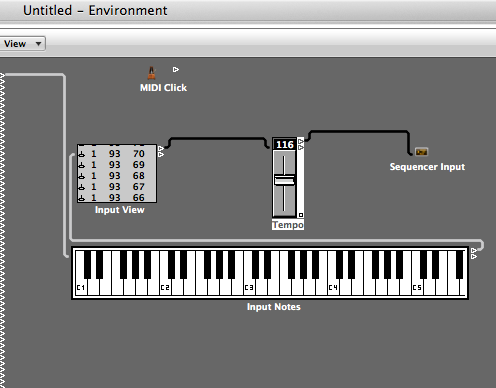
Click the Tempo Control once if it’s not already selected. The panel on on the left side of the Environment window will show you the various options for whatever Environment object you have selected. In the Input field you’ll notice it says “PitchBd” for Pitch Bend. This is the default method to control the Tempo...this doesn’t make sense to me though since the Pitch Bend re-centers itself every time you release the control. If anyone knows why Apple would have chosen this, please mention something in the comments.
It’s easy to change the Tempo Control so it can be used with a knob or slider from your controller instead. Click where it shows the word PitchBd and you’ll be presented with a list of other MIDI options. Choose “Control.” Below it, choose the MIDI channel your keyboard controller is sending on (probably 1), then select the specific CC # the knob/slider is sending. You can see the CC number coming from your MIDI controller by watching the Input View...twist the knob/slide the slider and watch the Input View...the first number is the MIDI Channel, the second is the CC# (what you’re looking for), and the last number is the value. The image above displays “1” as the MIDI channel, “93” as the CC #, and various numbers for the value.
Once your controller is set up, your ready to go. Simply start Logic and move your controller! If you stop Logic then start again, the tempo returns to the last value displayed on the transport (I think this is a bug). In a live situation, this would obviously not be a problem since you’d hopefully not stop in the middle, but if you’re working with artists in your studio, you’ll want to actually record the changes you’re making.
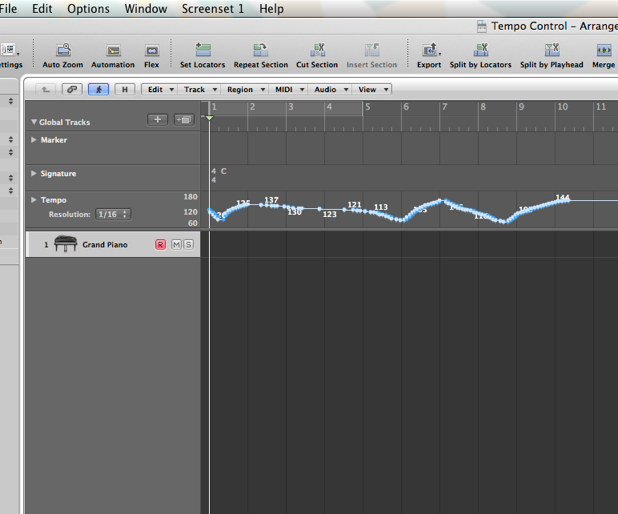
Hit “G” on your keyboard to display the Global Tracks. Create a new track and choose “External MIDI.” Just leave the track at it’s default setting and press the record button on the Transport. When you move the controller you assigned to Tempo Control, it get’s recorded!
Check out the Tempo Global Track...everything you just did will be displayed there. (see image below). Keep in mind that since MIDI CC’s only sends from 0 to 127, your limited to 128 different BPM values. The Tempo Control object starts at 50 BPM to 177 BPM (128 values). This range covers most popular genres of music.
Hope this helps...and if this Isn’t your thing, maybe this will get your more interesting in messing around in the Environment!
blog comments powered by Disqus
Drum Rolls Made Easy in the Hyper Editor
Drawing in snare rolls, kick rolls, hat trills, etc. in your drums can be a daunting task in Logic’s Piano Roll. Only one note at a time can be entered per mouse click, and making velocity crescendo’s is not easy. It’s such a pain, that many musicians don’t do them at all, instead, they add audio loops and simply cut the fills from them. In the Hyper Editor however, notes can be “drawn” in with a single click-hold. You specify the note value you’ll be drawing with, and the velocity is represented by the height of the event you draw. These are called “Hyper Sets.” Think of them like little custom editors for MIDI notes, CC messages, Velocity, etc.
I’m showing UltraBeat in this lesson, but this will work for any drum module like MicroTonic, Battery, RM5, Punch, etc. The image below shows a MIDI region dragged from the UltraBeat. Let’s do a snare roll within this region.

To make it easier, we’ll simply “Command - A (Select All), everything within the region. You can however, be very specific and only choose the one or two sounds you know you’ll be altering...simply shift click the vertical keyboard --on the notes to the drum sound(s) you want to choose--. After doing this, click over to the Hyper Editor (“Y” is the key command). From the local “Hyper” menu select “Create Hyper Set for Current Events” (see image below). This makes a custom Hyper Set specifically for the drum sounds you selected in the region.

You’ll notice that each horizontal lane represents the MIDI note that each of your drum sounds is assigned to on your drum instrument. Click on any of the grey/blue peaks on each of the lanes, and you’ll hear the sound assigned to it. At this point I’d suggest naming each lane appropriately like “Snare,” “Kick,” “Hats,” etc. You can name them by double clicking the header of the event definition in the inspector (it’s directly to the right of the disclosure triangle). (See image below). This way you don’t have to worry about what sound your about to edit and where it is. You should also name the Hyper Set. Directly above the area you named each instrument, you’ll see the name of the Hyper Set and a drop down menu next to it for selecting them. The field will have the virtual instrument name in it, or the name of the channel strip (mine says Ultrabeat). Click once within this field and re-name it something meaningful like “Snare Roller” or “Drum Editor.” You will be able to bring this editor back up at any time to modify any selected MIDI region. For example, when your finished laying the drums out, you can go back, select any drum region, open the Hyper Editor window and select your custom Hyper Set to add a fill/roll. Only the currently selected region (and it’s corresponding loop(s) *if any*) is affected.
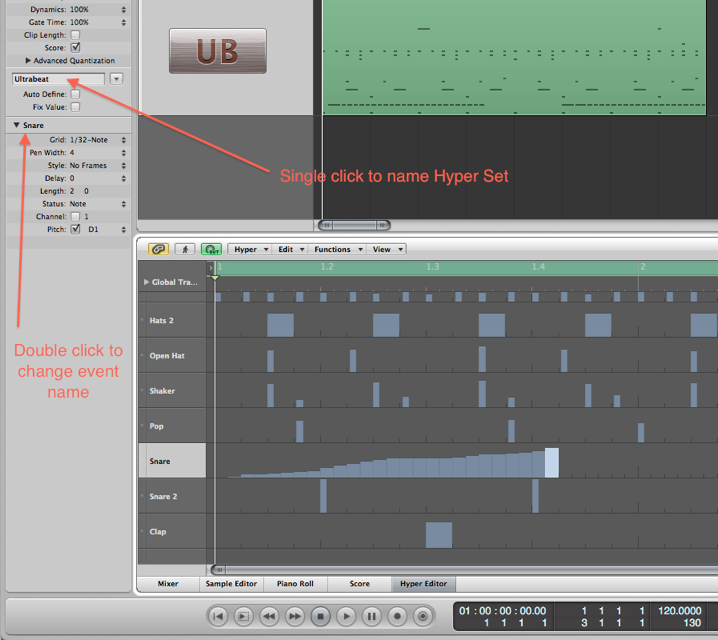
Look at the event definition menu in the inspector...you can choose each lane’s Grid, Pen Width, Delay, etc. The “Grid” is where you select the smallest value a note can be placed on. The “Pen Width” is important too...a value of 4 equals a 32nd note length, so if you’ll be drawing in values smaller than 32nd notes --for those crazy head popping snare rolls!-- make sure to set the Pen Width value to 1 or 2. Hit the ESC key and make sure the Pencil tool is selected. You can now draw into each of the drum lanes! Find your snare lane and literally draw a snare roll (like I did above). You might want to zoom in to increase the height/width of each lane. Remember you don’t have to release the mouse like you do in the Piano Roll, the higher you go in the lane, the louder the velocity will be. Try different Grid values on different lanes...use the “delay” function in the event definition window to push an individual drum sound forward or back in time....the sky is the limit!
Hope this inspires you to create amazing fills...till next time!
blog comments powered by Disqus
Snap Flex Mode Transients to Other Transients or MIDI Notes
Flex Mode was introduced in version 9 and allows you to literally play with your audio like putty. You can place a Flex Marker on a transient and move it forward or backward to adjust it’s time --with or without effecting the audio before or after--. You can also quantize audio in much the same way you quantize MIDI regions.
A lesser known function of Logic’s Flex Mode is the ability to “snap” a transient to another audio or MIDi region (for example, an un-quantized MIDI or audio region that has a great groove). This allows you to line up different parts of your song so they have the same ebb and flow as each other, or so they all hit at the same time.
When you place a Flex Marker in a region, simply don’t release the mouse, and move down or up to the region with the transient you want to snap to. In this case (above) I’ve nudged the transient on top, to line-up with the transient on the beat below it. So it’s easier to see, a yellow line extends to the transient you’re attempting to line up to.
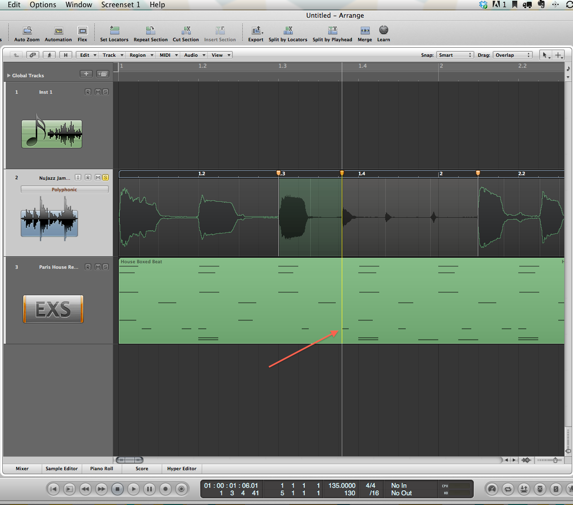
You can also snap to MIDI! You do this in the same exact way as described above, but instead, the yellow line snaps to the note-on or note-off of MIDI notes (see red arrow). Tip: Try nudging transients to the note-off positions for amazing syncopated parts.
blog comments powered by Disqus
EXS24 Sample Libray on multiple Macs
Today’s tip is for Logic EXS24 users with multiple Macs. Many people have enormous EXS24 sample libraries including myself! If you’re not familiar with the EXS24 you should be! In addition to it’s large built-in sampled instrument library, the EXS24 allows you to “install” 3rd party sampled instruments from tons of different vendors like Eastwest and Big Fish Audio. These allow you to extend your EXS24 library with thousands of additional sampled instruments.
When you have two or more Macs however, organizing these libraries can get very confusing. There’s a simple trick to taming this, but first your EXS instrument library needs to be loaded onto an external drive. You might be able to do this with a network connected drive, but I’d guess this could be unreliable at times especially if the network is being used heavily. Also, if the network is down, you have zero access to your instruments. I’d suggest physically connecting the drive to the specific Mac to access the library. The drive you install these instruments on should be a relatively fast drive; in addition to instruments simply being loaded into RAM, the EXS24 has the ability to “stream” audio directly from the drive when not enough RAM is available, so the faster the better.
When you buy an instrument pack, they normally come in various formats: EXS24/Kontakt/Giga etc. You’re looking for instrument packs that support the EXS or EXS24 format. These instruments normally come in two folders. One folder has the actual audio recordings/samples in it, and the other folder contains the EXS24 “instruments.”
To install on the external drive:
- Create folders at the root of the external drive called “EXS Samples” and “EXS Instruments,” then drag the content to the respective folders.
- Make an alias of the “EXS Instruments” folder you created on your external drive in Step 1. To create an alias, select the folder by clicking on it once, then press “Command-L”
- Drag the alias you created in Step 2 to the “Sampler Instruments” folder of the internal drive on your different Macs in this path: Macintosh HD (or whatever you’ve named your drive): Library: Application Support: Logic: Sampler Instruments
- The instruments will be accessible within the ESX24 under the “Factory” drop-down menu when selecting instruments.
That’s it!
Every time you drag new content to the two folders you created on the external drive, your various Macs’ EXS24 instruments will always be current. This works great if you work with a lot of different Logic musicians too...simply plug in your drive and drag the alias to their Sampler Instruments folder. You’ll have instant access to your entire library.
Hope you found this tip useful!
blog comments powered by Disqus
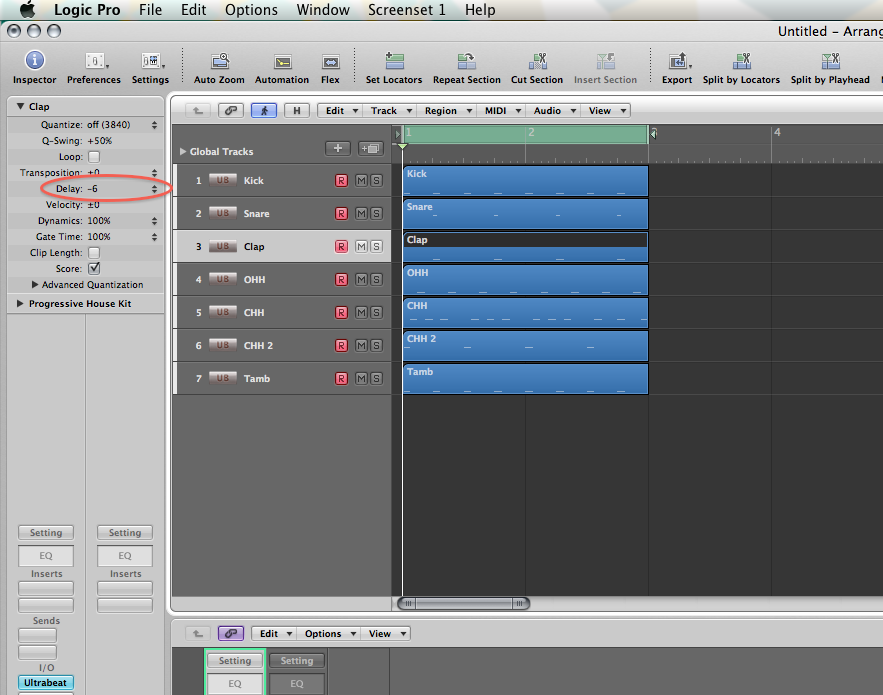
Fine tuning the groove of your tracks in the Region Parameters
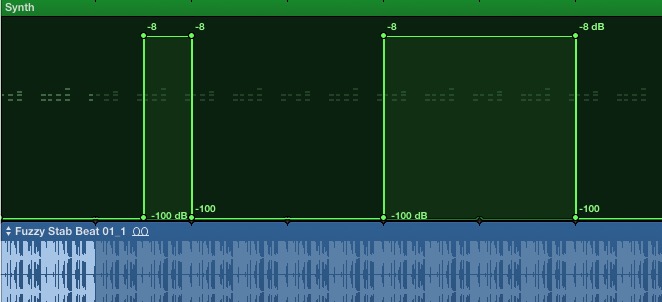
If you like to sequence your individual drum parts like I do, you’ll appreciate this tip! This is great on drum parts, percussion, or nearly anything where a “groove” is necessary. It enables you to move an individual selected region (MIDI or Audio) back/forward a very small amount for perfecting the feel of a part. For example you can nudge a lazy snare sound back in time for a tighter feel, or chill a nervous hi hat part by pushing it forward. For the experimental side in you, you can also move regions by tempo synchronized note values. The “Delay” function in the region info window (in the top drop-down window of the Inspector) allows you to do this without physically moving the region itself. Logic calculates the position and plays the region back or forward in time by the value you specify. This is great when arranging too since the region hasn’t actually moved --(it’s not slightly hanging over a bar position).
First make sure that you actually have a region selected. The image below shows the “clap” region as selected. If you click where the up/down pointing triangles are, you’ll be presented with a list of musical note values. Going above the zero position will play the region forward in time, and below the zero point will play it back in time. Now this works great when you want to experiment with the position a region is played back from (try large note values like minus one 16th note, or plus three 16th notes), but those values are too large, even for the lowest selectable value -of a 192nd note-...we’re simply looking to perfect “the feel.” Click and hold to the left of the up/down triangle selector (this area will sometimes have no value in it at all, mine shows -6 in the image below), then move your mouse up/down to edit the value by sequencer ticks...much better! Try this on your separated drum parts...you’ll be amazed.
blog comments powered by Disqus
