Drum Rolls Made Easy in the Hyper Editor
14/09/11 09:01
Drawing in snare rolls, kick rolls, hat trills, etc. in your drums can be a daunting task in Logic’s Piano Roll. Only one note at a time can be entered per mouse click, and making velocity crescendo’s is not easy. It’s such a pain, that many musicians don’t do them at all, instead, they add audio loops and simply cut the fills from them. In the Hyper Editor however, notes can be “drawn” in with a single click-hold. You specify the note value you’ll be drawing with, and the velocity is represented by the height of the event you draw. These are called “Hyper Sets.” Think of them like little custom editors for MIDI notes, CC messages, Velocity, etc.
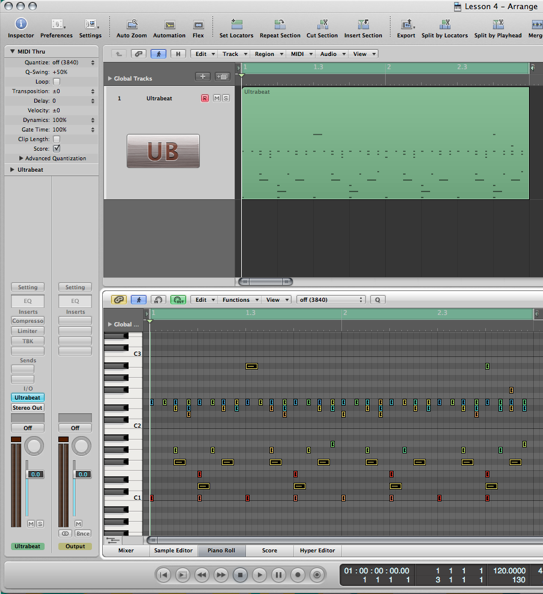
I’m showing UltraBeat in this lesson, but this will work for any drum module like MicroTonic, Battery, RM5, Punch, etc. The image below shows a MIDI region dragged from the UltraBeat. Let’s do a snare roll within this region.
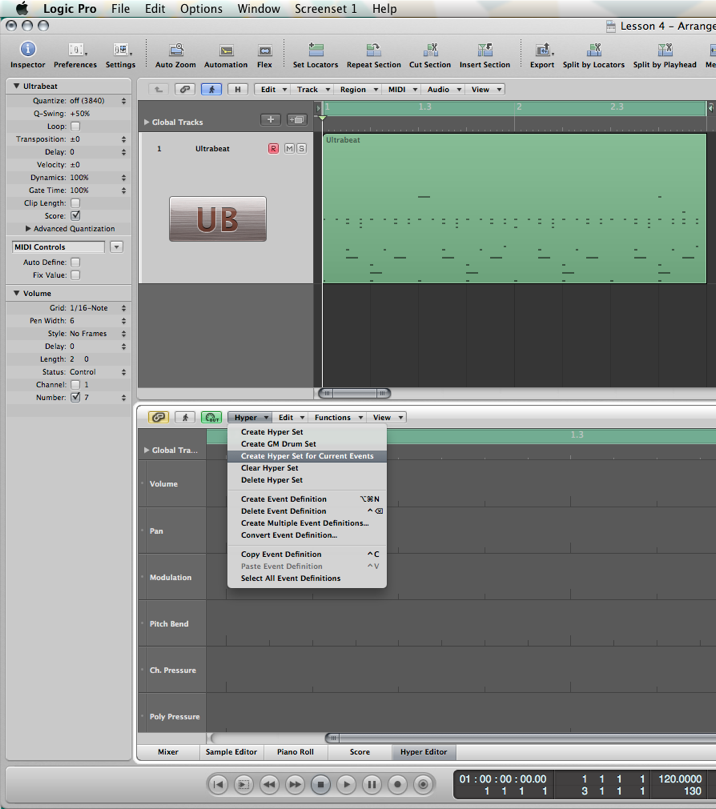
To make it easier, we’ll simply “Command - A (Select All), everything within the region. You can however, be very specific and only choose the one or two sounds you know you’ll be altering...simply shift click the vertical keyboard --on the notes to the drum sound(s) you want to choose--. After doing this, click over to the Hyper Editor (“Y” is the key command). From the local “Hyper” menu select “Create Hyper Set for Current Events” (see image below). This makes a custom Hyper Set specifically for the drum sounds you selected in the region.
You’ll notice that each horizontal lane represents the MIDI note that each of your drum sounds is assigned to on your drum instrument. Click on any of the grey/blue peaks on each of the lanes, and you’ll hear the sound assigned to it. At this point I’d suggest naming each lane appropriately like “Snare,” “Kick,” “Hats,” etc. You can name them by double clicking the header of the event definition in the inspector (it’s directly to the right of the disclosure triangle). (See image below). This way you don’t have to worry about what sound your about to edit and where it is. You should also name the Hyper Set. Directly above the area you named each instrument, you’ll see the name of the Hyper Set and a drop down menu next to it for selecting them. The field will have the virtual instrument name in it, or the name of the channel strip (mine says Ultrabeat). Click once within this field and re-name it something meaningful like “Snare Roller” or “Drum Editor.” You will be able to bring this editor back up at any time to modify any selected MIDI region. For example, when your finished laying the drums out, you can go back, select any drum region, open the Hyper Editor window and select your custom Hyper Set to add a fill/roll. Only the currently selected region (and it’s corresponding loop(s) *if any*) is affected.
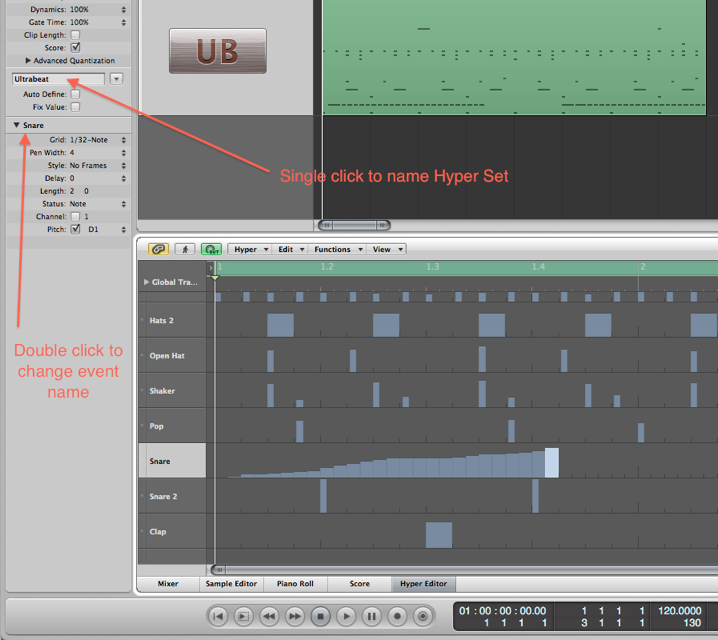
Look at the event definition menu in the inspector...you can choose each lane’s Grid, Pen Width, Delay, etc. The “Grid” is where you select the smallest value a note can be placed on. The “Pen Width” is important too...a value of 4 equals a 32nd note length, so if you’ll be drawing in values smaller than 32nd notes --for those crazy head popping snare rolls!-- make sure to set the Pen Width value to 1 or 2. Hit the ESC key and make sure the Pencil tool is selected. You can now draw into each of the drum lanes! Find your snare lane and literally draw a snare roll (like I did above). You might want to zoom in to increase the height/width of each lane. Remember you don’t have to release the mouse like you do in the Piano Roll, the higher you go in the lane, the louder the velocity will be. Try different Grid values on different lanes...use the “delay” function in the event definition window to push an individual drum sound forward or back in time....the sky is the limit!
Hope this inspires you to create amazing fills...till next time!
blog comments powered by Disqus
Comments
