
Merging Tracks from Different Logic Projects
03/10/11 23:17
Have you ever wanted to grab an element from a different song and use it in the one you’re currently working on? How about reverting a single track to its original state from a previously saved version? Before Logic 9, merging elements from different Logic Projects was a pain. In this tip, I’ll show you how easy it is.
First of all, open a Logic Project (any will do). You’ll be extracting a complete individual track from another song --with everything that makes it play back--, including the Channel Strip, the Audio/MiDI region(s), and even any busses you were using!
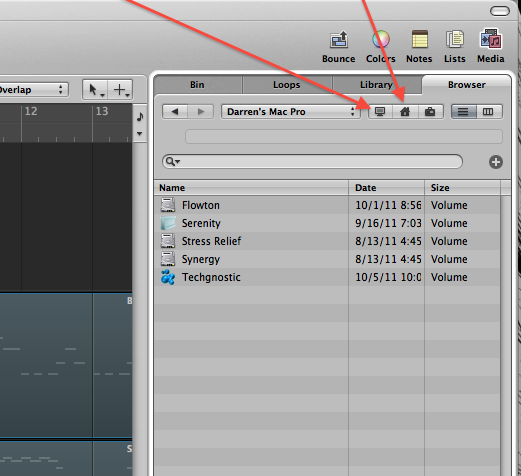
Next, press the “F” ket to bring up Logic’s built in File Browser, and navigate to the location of the source Logic Project. (If the project is on an external drive, click the icon that looks like a screen, if it’s in your Home Folder, then click the house icon.) See Image below.
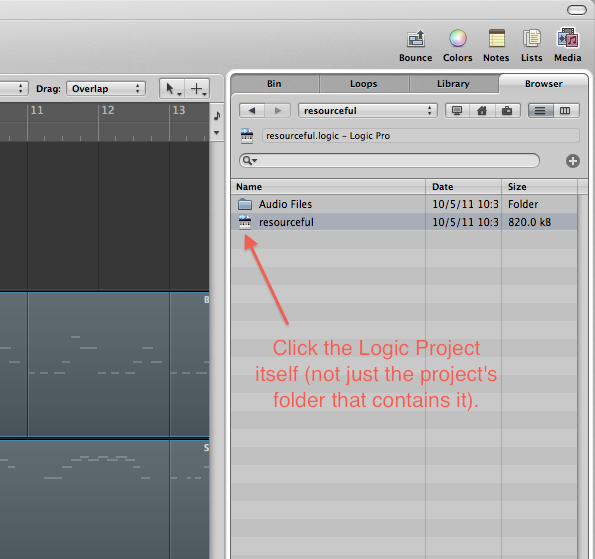
When you find the song, open the Project Folder by double-clicking on it. Select the actual Logic Project itself by clicking on it once. See image below.
Click the “Import...” button at the bottom of the File Browser Window.
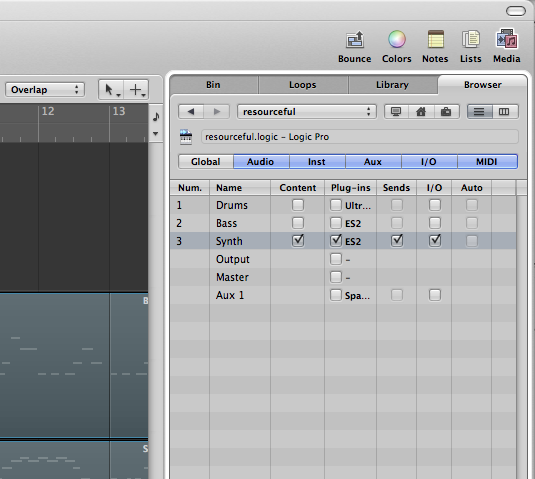
You’ll now see a list of all the tracks in the source Logic Project/Song. Simply look for the track (this is where naming each of your tracks properly comes in handy!), and select everything across the row, that you can put a check-box on See Image Below.
Now, at the bottom of the File Browser Window select either “Replace” or “Add.” This will either replace the currently selected track in the Arrange Window, or create a new one with your chosen track.
In the image above, take a look at some of the other things you can import like Automation and even the Global Tracks!
Hope this helps, and thanks for reading!
blog comments powered by Disqus
Comments
Fine tuning the groove of your tracks in the Region Parameters
23/08/11 14:01
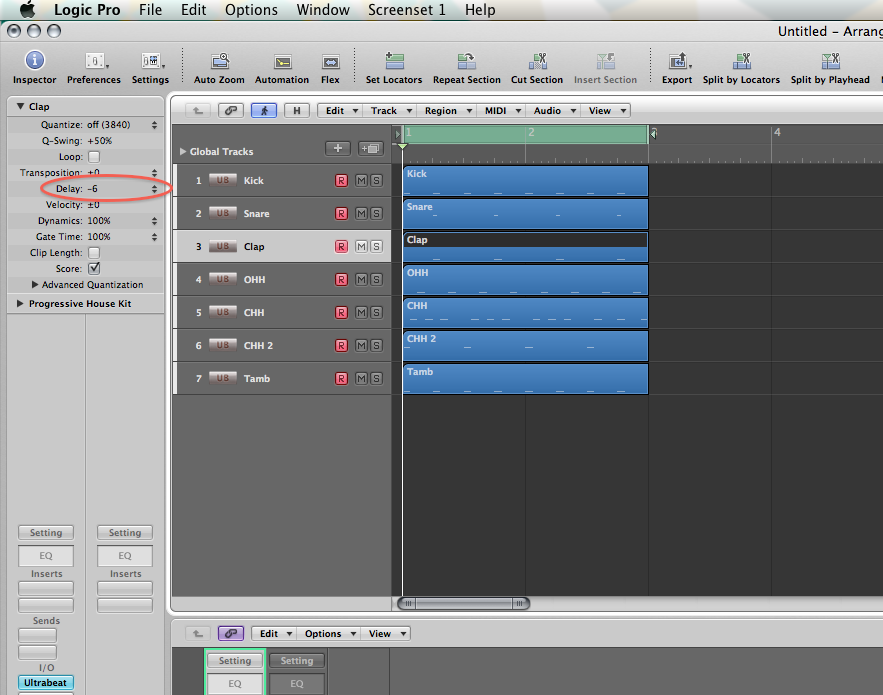
If you like to sequence your individual drum parts like I do, you’ll appreciate this tip! This is great on drum parts, percussion, or nearly anything where a “groove” is necessary. It enables you to move an individual selected region (MIDI or Audio) back/forward a very small amount for perfecting the feel of a part. For example you can nudge a lazy snare sound back in time for a tighter feel, or chill a nervous hi hat part by pushing it forward. For the experimental side in you, you can also move regions by tempo synchronized note values. The “Delay” function in the region info window (in the top drop-down window of the Inspector) allows you to do this without physically moving the region itself. Logic calculates the position and plays the region back or forward in time by the value you specify. This is great when arranging too since the region hasn’t actually moved --(it’s not slightly hanging over a bar position).
First make sure that you actually have a region selected. The image below shows the “clap” region as selected. If you click where the up/down pointing triangles are, you’ll be presented with a list of musical note values. Going above the zero position will play the region forward in time, and below the zero point will play it back in time. Now this works great when you want to experiment with the position a region is played back from (try large note values like minus one 16th note, or plus three 16th notes), but those values are too large, even for the lowest selectable value -of a 192nd note-...we’re simply looking to perfect “the feel.” Click and hold to the left of the up/down triangle selector (this area will sometimes have no value in it at all, mine shows -6 in the image below), then move your mouse up/down to edit the value by sequencer ticks...much better! Try this on your separated drum parts...you’ll be amazed.
blog comments powered by Disqus
