
Logic Pro Beat Production Tips 1
01/07/12 11:28
One of my Logic Pro tips on creating kick drum sounds with the ES1 synthesizer was published in a free macProVideo iBook: "Logic Pro Beat Production Tips 1." The book is only available for iPad, so the link won't work on iPhone. Feel free to download it!
blog comments powered by Disqus
blog comments powered by Disqus
Comments
EXS24 Sample Libray on multiple Macs
30/08/11 09:59
Today’s tip is for Logic EXS24 users with multiple Macs. Many people have enormous EXS24 sample libraries including myself! If you’re not familiar with the EXS24 you should be! In addition to it’s large built-in sampled instrument library, the EXS24 allows you to “install” 3rd party sampled instruments from tons of different vendors like Eastwest and Big Fish Audio. These allow you to extend your EXS24 library with thousands of additional sampled instruments.
When you have two or more Macs however, organizing these libraries can get very confusing. There’s a simple trick to taming this, but first your EXS instrument library needs to be loaded onto an external drive. You might be able to do this with a network connected drive, but I’d guess this could be unreliable at times especially if the network is being used heavily. Also, if the network is down, you have zero access to your instruments. I’d suggest physically connecting the drive to the specific Mac to access the library. The drive you install these instruments on should be a relatively fast drive; in addition to instruments simply being loaded into RAM, the EXS24 has the ability to “stream” audio directly from the drive when not enough RAM is available, so the faster the better.
When you buy an instrument pack, they normally come in various formats: EXS24/Kontakt/Giga etc. You’re looking for instrument packs that support the EXS or EXS24 format. These instruments normally come in two folders. One folder has the actual audio recordings/samples in it, and the other folder contains the EXS24 “instruments.”
To install on the external drive:
- Create folders at the root of the external drive called “EXS Samples” and “EXS Instruments,” then drag the content to the respective folders.
- Make an alias of the “EXS Instruments” folder you created on your external drive in Step 1. To create an alias, select the folder by clicking on it once, then press “Command-L”
- Drag the alias you created in Step 2 to the “Sampler Instruments” folder of the internal drive on your different Macs in this path: Macintosh HD (or whatever you’ve named your drive): Library: Application Support: Logic: Sampler Instruments
- The instruments will be accessible within the ESX24 under the “Factory” drop-down menu when selecting instruments.
That’s it!
Every time you drag new content to the two folders you created on the external drive, your various Macs’ EXS24 instruments will always be current. This works great if you work with a lot of different Logic musicians too...simply plug in your drive and drag the alias to their Sampler Instruments folder. You’ll have instant access to your entire library.
Hope you found this tip useful!
blog comments powered by Disqus
Fine tuning the groove of your tracks in the Region Parameters
23/08/11 14:01
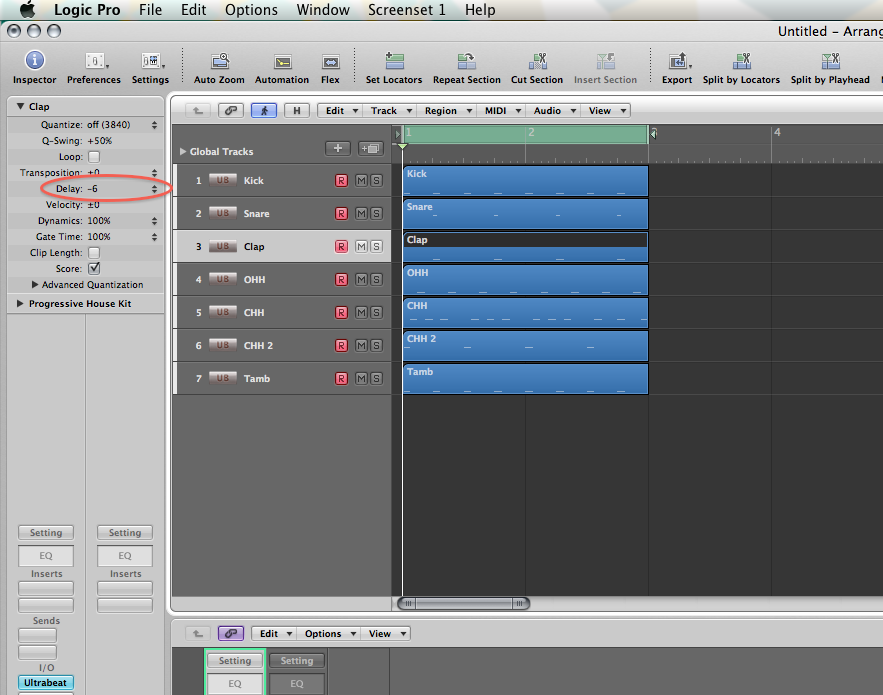
If you like to sequence your individual drum parts like I do, you’ll appreciate this tip! This is great on drum parts, percussion, or nearly anything where a “groove” is necessary. It enables you to move an individual selected region (MIDI or Audio) back/forward a very small amount for perfecting the feel of a part. For example you can nudge a lazy snare sound back in time for a tighter feel, or chill a nervous hi hat part by pushing it forward. For the experimental side in you, you can also move regions by tempo synchronized note values. The “Delay” function in the region info window (in the top drop-down window of the Inspector) allows you to do this without physically moving the region itself. Logic calculates the position and plays the region back or forward in time by the value you specify. This is great when arranging too since the region hasn’t actually moved --(it’s not slightly hanging over a bar position).
First make sure that you actually have a region selected. The image below shows the “clap” region as selected. If you click where the up/down pointing triangles are, you’ll be presented with a list of musical note values. Going above the zero position will play the region forward in time, and below the zero point will play it back in time. Now this works great when you want to experiment with the position a region is played back from (try large note values like minus one 16th note, or plus three 16th notes), but those values are too large, even for the lowest selectable value -of a 192nd note-...we’re simply looking to perfect “the feel.” Click and hold to the left of the up/down triangle selector (this area will sometimes have no value in it at all, mine shows -6 in the image below), then move your mouse up/down to edit the value by sequencer ticks...much better! Try this on your separated drum parts...you’ll be amazed.
blog comments powered by Disqus
